Tuesday, 20 December 2016


Christmas happens to be my favourite time of the year, I've been doing an exercise past a couple of months to keep the nightmares away and that is to pen down happy memories before I go off to sleep, while doing so I was reminded of one such tasteful memory of christmas and more particularly guava cheese, my paternal aunt headed a school run by a british family and every christmas they would send us christmas sweets and goodies, of them the cheese used to be my favourite, hence I got my grandmother to eventually learn the recipe, although she did but it dint quite taste as good as the one uncle Everett used to send and since then (it must have been almost 14 years ) that I'm looking for the taste that lingers in my memory,until when I finally decided to give it a shot myself. First I tried the recipe which was passed on to my mother from my grandmother, it didn't go well at all since it was too complicated and just too many steps to follow. I tweaked that recipe to my suitability and came up with a super easy version of it and I relived the lingering taste in my memory. I hope you all enjoy this recipe.


Ingredients:

  • 1 kg Guava (preferably pink ones, since i couldn't find them i used the white )
  • Sugar, equal to the guava pulp* (follow the instructions in the method )
  • Lemon* 1/2 tsp per each cup of pulp


Method:

  • Cut the guavas into 4 parts 
  • Pressure cook them for 2 steam releases with just enough water to cover them.
  • Churn the cooked guavas with it water in a blender, into a pulp.
  • Sieve the pulp to separate the seeds.
  • Measure the pulp, and add equal quantity of sugar. *(1 Kg guava gives approximately 4 cups of pulp)
  • In a heavy bottomed pan cook the pulp and sugar on medium heat, until it boils and starts bubbling.
  • Add the lemon juice.
  • Keep cooking until the mixture is thick and leaves the sides of the pan.*(add any colour you desire), this will approximately take 1.5 hours.
  • Transfer the thickened pulp, in a greased pan.
  • Allow it to cool overnight before you cut the cheese into cubes.


0

Sunday, 18 December 2016


Christmas happens to be just around the corner and that's more than a reason for me to throw on my mittens, wrap up an apron, sip  wine and spend the Sunday lingering of christmas bakes whilst gaining a few extra pounds to give due justice to my most favourite time of the year. The recipe I'm posting today is of a rustic dry cake loaf, the texture of which resembles more to a bread over a cake.  I picked up this recipe from a small village named Ahore, in the interiors of Rajasthan, where our host treated us to a tweaked version of this cake and I couldn't resist jotting it down and sharing it with all of you. The loaf is perfect to begin feeling christmas-y already. I had my first slice post dinner with plain cream spread on the slice and paired it with merlot and trust me, a nice crisp almond crust, warm vanilla tingling the tastebuds and the earthy notes of the wine complemented each other beyond my expectations. The cake is light and beautiful in texture, you may enjoy its as it is or have it with a warm cup of black tea or coffee.


INGREDIENTS :

  • 250 gms Flour (Maida), for a healthier alternative you can make it 125 gms of whole wheat flour and 125 gms of cake flour.
  • 250 gms Granulated sugar 
  • 100 gms clarified butter (ghee)
  • 1.5 tsp baking powder 
  • 6 eggs
  • 1 vanilla stick/ 7-8 drops of vanilla essence/ 3-4 drops of vanilla extract
  • 4 tbsp almond flakes


METHOD:

  • Pre-heat the oven at 180 degrees.
  • Grease a 9 inch loaf tin with clarified butter (ghee) and sprinkle flour on the edges of the tin.
  • Whisk together the sugar and clarified butter, until it reaches a creamy texture, 2 minutes with an electronic whisk, 3-4 minutes if whisking by hand.
  • Add in the eggs, 2 at a time and keep whisking until combined well, you will see an airy batter with small bubbles on the surface.
  • Slit the vanilla stick, scrape out the vanilla, mix it into the mixture, or add the vanilla essence to the mixture.
  • Sieve the flour and baking powder into the mixture while whisking, do it gradually in three parts.
  • Fold in 2 tbsp of the almond lakes into the mixture.
  • Spoon the mixture into the greased tin. Sprinkle the remaining two tbsp of almond flakes on the batter.
  • Bake at 180 degrees for 45-55 minutes depending on your oven, or until skewer comes clean.


0

Friday, 8 July 2016


I haven't been active in posting my recipes since about two months, owing to the constant activities that have kept me busy both on the professional as well as personal front of life and guess what i'm engaged, hence i decided to share the recipe that expresses the emotion of comfort decked up on a beautiful stage, the analogy drawn here is to the various components I've used to enhance my most favourite comfort dessert the banoffee pie, I'm a fan of all the independent components that go into making a banoffee each one has a distinct flavour and texture and the combination together is just heavenly, don't you all agree??? Although my religious routine of watching Masterchef Australia has taught me various skills that I wasn't  friendly with earlier perhaps, but eventually with practice I've got the hang of a couple of them. I have tried to give the classic banoffee a make over by smoking its crumb with brandy, adding cinnamon to the toffee sauce, plating it with a white chocolate chilly ganache and honey comb.


INGREDIENTS:

For the crust :
  • 5 digestive cookies (crumbed)
  • 2-3 Tbsp butter (salted/unsalted) as per preference, the butter should be just enough to moisten the digestive cooke crumb, so that when you press it the pie mould
  • 1/2 cup brandy
For the toffee:

I usually make the toffee, by slow cooking the contended milk tin in simmer water, the can should be immersed in water at all times this method takes 5-6 hours.

For the instant toffee:

  • 30 gms brown sugar 
  • 30 gms butter 
  • 103 gms condensed mik.
  • A pinch of cinnamon or sea salt 

  • Whipping cream
  • 1 banana 
For the honey comb :
  • 2 tbsp sugar
  • 2 tbsp golden syrup
  • 3/4 tsp soda bi-carbonate
For the white chocolate ganache: 
  • 50 gms white chocolate, finely chopped/ shreaded
  • 45 gms cream
  • 1 tsp red chilli powder 
  • red food colouring 

METHOD:


  •  Blitz the biscuits in a food processor to a coarse crumb texture.
  • To smoke the crumb, add 1/2 cup of brandy in a wok, place a bamboo steamer over the wok on low flame , keep the crumb on a foil in the bundle and cover it and let it sit for 8-10 minutes. 
  • Keep the smoked crumb in the oven to lose any moisture if it has absorbed, for 2 minutes on 150 degrees in a preheated oven.
  • Add the butter to the crumb, and mix well, press the crumb mixture in a greased pie tin, to 1/2 an inch thickness. Allow it to set in the fridge.
  • FOR THE TOFFEE SAUCE: In a heavy bottomed pan, on low heat, add the butter and sugar until the sugar melts, add in the condensed milk and whisk until it reaches a golden brown colour, remove it from heat and add the cinnamon to it.
  • FOR THE HONEY COMB: Mix the syrup and sugar in the pan , before putting it on flame, Again in a heavy bottomed pan on low heat, allow the mixture to heat, for about 2-3 minutes till it starts bubbling, mix in the soda bi-carb and whisk it, the mixture will look like an erupting volcano, pour this hot mixture into a greased baking tray lined with reusable parchment paper. or just grease the tin well so that it is easy to use the honeycomb.
  • FOR THE WHITE CHOCOLATE GANACHE: Simmer the cream on low heat , until the edges have small bubbles forming. mix this into the white chocolate and whisk until smooth, mix in the chilli and food colouring, Pour it in a sauce dispenser and cool it in the refrigerator.
  • ASSEMBLING THE PIE: De-mould the crust, spoon in a layer of the toffee sauce, slice the banana and arrange it over the toffee sauce, top it with whipped cream and plate the accompaniments as you like.


0

Tuesday, 8 March 2016


This post and recipe is dedicated to celebrate the spirit of woman in all respect. We used strawberries specifically because the sweetness and slight sourness of the berry highlights the characteristic qualities of women of being jovial, delicate, vibrant and bubbly. The soft and airy texture of the mousse alternating with the moist and dense sponge is symbolic of the soft kindness and ineffable strength she's born with, the layering of the cake strikes a balance between the two textures in the dish and speaks of feminine characteristics. 
Wishing all the lovely ladies a very happy women's day.

INGREDIENTS:


FOR ONE SPONGE:

You'll be baking two sponges so double up the quantities.
  • 60 gms Flour (Maida) 
  • 50 gms powdered sugar 
  • 35 gms Egg 
  • 34 gms Butter
  • 16 gms Curd 
  • 24 gms Milk 
  • A pinch of baking powder
  • A pinch of baking soda
  • 3-5 drops of Vanilla extract 
FOR THE MOUSSE
  • 1 Cup soft vanilla ice cream ( Melt if for 15-20 minutes on room temperature before using it )
  • 1 pack of instant strawberry jelly ( we used jello)
  • 1/4 cup sugar
  • 3 egg whites
  • 1 cup of warm water
  • 1 cup of cold water

METHOD:

BAKING THE SPONGE 

  • Pre-heat the oven at 180 degrees celsius and grease two 5 inch cake moulds.
  • Sieve the flour and add the pitch of baking soda and baking powder to it and keep aside.
  • Whisk the butter and sugar for about a minute with an electric mixer or 2 minutes by hand.
  • Add in the egg and mix well, follow this step by adding in the curd and mix the ingredients well.
  • Add in the flour to this mixture, alternating it with the milk. Whisk it for about 2 minutes .
  • Spoon the batter in the cake moulds, and bake for 11-15 minutes.
  • Cool on wire rack for half an hour.
  • Repeat the steps for the second sponge.

PREPARING THE MOUSSE:

  • In a large mixing bowl, add the jelly powder, pour over 1 cup of warm water and stir well. 
  • Add the cold water to this mixture and mix well. Add in the semi-solid ice cream.
  • Allow this mixture to rest in the freezer until semi-set.
  • Meanwhile whisk the egg whites to stiff peaks.
  • Remove the jelly-icecream mix from the freezer, whisk it until it reaches a wobbly liquid stage, avoid whisking it on high speed, it makes it watery.
  • Fold in the stiff egg whites to this mixture.
  • Mix in the sugar.

ASSEMBLING THE LAYERS:

  • Place one sponge at the bottom of a well greased spring foam cake tin, if not place it on the dish you would like to serve your cake.
  • Spread 1.5 cup of the mousse mix on the sponge and smoothen it.
  • Alternating with the sponge follow the steps again.


0

Monday, 7 March 2016


Hello everyone, hope you all had a wonderful weekend. This weekend for us was nourishing and a learning process about various things in life, our best learning experience was this delicious Oats and Whole wheat Irish Soda bread, that our father taught us patiently while we asked him a million questions to feed our curiosity. The Irish bread was a Poor man's meal and became an international favourite over the centuries, as a matter of following tradition a cross was cut over the bread before baking it, as a measure of protection from the devil. As compared to breads made with yeast as a leaving agent, the texture of the Irish bread is dense with a hard top  Follow the simple steps to enjoy this yummy bread.


INGREDIENTS:


  • 200 gms Whole-wheat flour
  • 50 gms Oats ( we use bagrry's oats, they are delicious)
  • 50 gms all purpose flour (maida)
  • 250 ml butter milk 
  • 3/4 Tsp bi-carbonate of soda (Baking soda)
  • 1 Tbsp Olive oil
  • 1 Tsp salt
  • 5-6 cloves of garlic, (crushed)
  • 1.5 Tsp rosemary or any other herb you like


METHOD:

  • Pre-Heat the oven at 200 degrees celcius, and grease a baking tray.
  • In a mixing bowl, add the flour, baking soda, salt, garlic and herbs. 
  • Add in the olive-oil and butter milk to the flour mixture, and bring it together with a wooden spoon/spatula or hand. ( The dough will be soft and sticky)
  • Flatten the dough on your greased baking tray ( approximately a 6 inch diameter), brush olive oil on the surface and sprinkle rosemary and a pinch of sea salt.
  • Use a sharp knife to make a cross on the dough.
  • Bake for 30-35 minutes or until golden brown. After baking let the bread rest in the tray for about 10 minutes followed by cooling on the wire rack for  2 minutes before slicing.
  • The bread is relished best with soup or stew. Although we enjoyed it with butter , feta cheese and basil leaves, it was delicious.

2

Tuesday, 23 February 2016


I've never been a morning person, hence I always leave for work in a hurry, skipping my breakfast. Im sure a lot of us face that problem, This recipe is made using Baggry's muesli and oats, my favourite brand of cereal, their products are wholesome and guarantee a tasteful morning. These cookies are high fibre and nutritious and aren't overtly complicated to prepare. They are perfect with a cold glass of milk.


INGREDIENTS:

  • 1/2 Cup Baggry's Muesli
  • 1/2 cup Baggry's oats
  • 1/2 cup sugar
  • 1/4 cup wholewheat flour
  • 1/4 + 1/3 cup flour (maida)
  • 1/3 cup almond meal
  • 3/4 cup softened butter 
  • 1 tsp baking powder 

METHOD:

  • Pre-heat the oven at 175 degrees celcius.
  • Whip the butter and sugar until light and creamy.
  • Add in the muesli, oats, flours and baking powder. Mix well
  • Add in the almond meal.
  • Apply little butter or oil on your palms roll the dough to the size of a groundnut and flatten it between your palms, almost 1/2 and inch of thickness. 
  • Place them at a distance on a greased baking sheet and bake for about 12-15 minutes or until golden brown.
  • Cool them on a wire rack for about 30-45 minutes before consuming. cooling allowed to cookies to harden and gives them the crunch. Warm cookies right out of the oven are soft.
  • Enjoy them for breakfast with a chilled glass of milk.


2

Wednesday, 3 February 2016


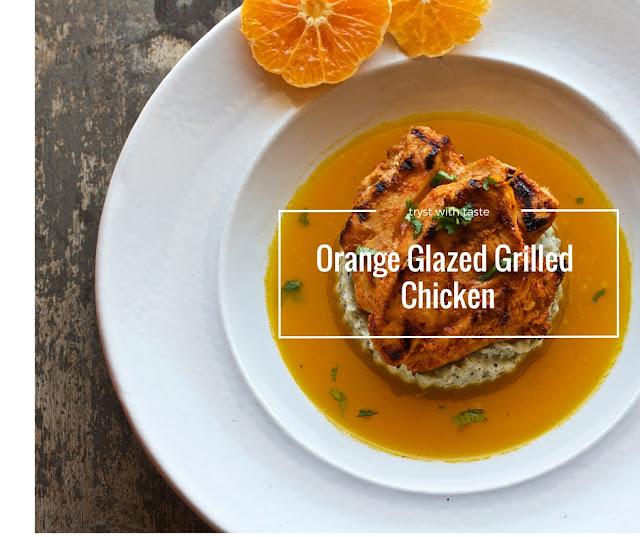
Savoury and fruit didn't appeal to my understanding before I experimented with apricots for one of my clients, we were all extremely pleased with the results of  those recipe. Hence i decided to experiment again with oranges and chicken, sounds unusual and tastes like a dream, keeping in mind the fruit centric healthy recipes for the blog, this one here is a complete meal with a balance of nutrients and burst of flavours and the presentation makes it a winner if you're trying to charm your loved one with some gourmet cooking this valentine's day. The chicken is flavoured with orange, honey, paprika and garlic, grilled to perfection and served on a mint mash potato bed and spiced orange jus.


INGREDIENTS:
  • 2 Chicken breasts
  • 2 Tbsp olive oil 
  • 1.5 Tbsp honey
  • 2.5 Tsp orange zest
  • Ginger garlic paste 1/2 Tbsp
  • 2 medium sized boiled potatoes
  • 1 Tbsp cream 
  • 1.5 Tsp dried mint leaves
  • 1 cup orange juice fresh/canned
  • 1 onion chopped finely
  • 5-7 cloves of garlic chopped finely
  • Salt and pepper as desired

METHOD:
  • Mix the honey, olive oil, ginger garlic paste, orange zest and paprika. Whisk well to combine all the elements together.
  • Pound the chicken, for even grilling its best to keep the thickness not more than 1/2 and inch.
  • Coat the chicken well with the honey-orange glaze we prepared in step 1.
  • I used an electric gill to grill the chicken, it took about 4-6 minutes on each side. the chicken can be pan seared too if you don't want it grilled.
  • FOR THE JUS: Drizzle about 1/2 a tsp of olive oil in a pan and sauté the onion and garlic until the onion is translucent, add a pinch a white pepper and salt as desired. Pour the orange juice and bring the mixture to a boil. Remove it from flame and sieve the mixture.
  • Was the boiled potatoes and add the cream and mint leaves to it.
PLATING : I plated my dish in a white bowl dish. I used a round mould to arrange my mash , placed my grilled chicken on the mash potato bed and poured the jus over my chicken. For garnishing I used flat leaf cilantro leaves.


0


Fruits are gorgeous, yummy and a rich source of various minerals required for the body. TWT this week will only be coming up with recipes having fruits as the core flavour of each dish. This salad here is basic with Apples, Dragonfruit , watermelon, tofu and processed cheese. Vegans can avoid the processed cheese and plate the salad on a bed of greens (rockets, body spinach and arugula) for the best combination of flavours, trust us it tastes as delicious.
The selection of ingredients was nutrient specific, fruits provide enough minerals and roughage , tofu for the protein intake and processed cheese gives the requisite amount of carbohydrates making this salad a perfect blend of flavour and nutrition.
It feels good when basic things also look extremely appealing to the eye,visual aesthetics play an important role in the culinary industry as a well plated and aromatic dish psychologically increases one's appetite.


INGREDIENTS:
  • Watermelon
  • Dragon Fruit
  • Apples
  • Tofu
  • Processed Cheese

METHOD:
  • Wash the fruits and peel them.
  • Cut each fruit in a sam sized square .
  • Stack the squares on top of each other and slice it equally both horizontally and vertically, to give you equal cubes of each fruit, tofu and cheese.
  • Arrange them Haphazardly to give it the look of a Rubik cube.
  • Have Fun.


0

Monday, 1 February 2016


Winter in India, particularly in the desert state of Rajasthan from where I write the recipe of this delicious ice -cream seems to be fading away, the afternoon temperature is soaring with a pleasant evening, us at the tryst with taste HQ decided to welcome our favourite season with my weakness dish!!! ICE-CREAM, I can never have enough of it ever, since its a fruit inspired week for our recipes , I wanted to do a rather unconventional fruit flavour for this post and its come out just as i had thought of it. Hope you all enjoy this flavourful ice-cream p.s.its eggless.

INGREDIENTS:
  • 1 cup heavy cream ( I used Amul fresh cream, don't confuse it with the whipping cream by the same brand)
  • 1 cup whole milk 
  • 1 cup fresh gooseberries ( churned in a food processor)* follow instructions in the method
  • 1/2 cup granulated sugar
  • pinch of salt
  • 2 drops of vanilla extract

METHOD:

  • *Blitz your gooseberries in the food processor, gooseberries have a lot of water content and hence can't be used directly, sieve out the pulp after blitzing. You would require a cup of this pulp for the recipe.
  • Mix the milk, cream, gooseberry pulp and sugar. Whisk this mixture well and allow it to cool in the freezer for about 30 minutes.
  • If you have an Ice-cream maker, keep the freezer bowl of it in the freezer overnight.
  • Add the mixture to your chilled ice-cream maker bowl and churn it for 15-18 minutes, until you get a soft set texture.
  • Spoon the ice-cream in a tin and freeze it for 20 minutes atlas for a perfectly set ice-cream.
SETTING THE ICE-CREAM WITHOUT AN ICE-CREAM MAKER:


  • *Blitz your gooseberries in the food processor, gooseberries have a lot of water content and hence can't be used directly, sieve out the pulp after blitzing. You would require a cup of this pulp for the recipe.
  • Mix the milk, cream, gooseberry pulp and sugar. Whisk this mixture well and allow it to cool in the freezer for about 30 minutes.
  • Remove this mixture from the freezer, allow it to melt slightly, whisk the mixture for 3-5 minutes and place the mixture back n the freezer.
  • Repeat this step at least 4-5 times after every 20-30 minutes and post that allow it to set for about an hour before serving it.


  • 0

    Sunday, 31 January 2016


    Since we've decided on doing a fruit inspired recipe week for the blog this one is a popular amongst my health conscious friends, although i did make slight variations on the presentation and flavours and boy! black grapes and strawberries together are sinful. This breakfast bowl is loaded with fruits and cereal and I've used soy milk and soy yoghurt for the smoothie, making it vegan friendly. Trust me its the easiest and prettiest breakfast ever! 


    INGREDIENTS:

    • 1/4 cup chia seeds, bloomed in soy milk (for about 1/2 hour)
    • 1/2 cup soy milk / skimmed milk if you aren't looking at a vegan option
    • 1 tbsp honey 
    • 4 Tbsp soy yogurt / curd
    • 2 tbsp toasted oats 
    • 2 tbsp cereal 
    • 5-6 blanched almonds
    • 1/2 cup black grapes 
    • Strawberries and Figs , as much as you like them 
    • Shredded coconut for garnishing.

    METHOD:

    • In a food processor, blitz the chia seeds grapes and some strawberries with the yogurt, soy milk and honey.
    • Can you believe , that's all , your smoothie is ready.
    • Garnish the smoothie with sliced strawberries and figs, all the cereal and oats.
    • Sprinkle with coconut and blanched almonds. 
    • DIG IN!!!!! 


    0

    Friday, 29 January 2016


    If I were a minion , I would be ba-naaaa-naaaaa over this bread certainly, most of my posts talk about a memory and this one isn't any different, as a kid,  while returning back from school and making guesses of what's going to be cooked for lunch used to be a daily routine, yes I've been that crazy about good food since and there is a no better chef to me than my grandmother , climbing up the staircase to the sweet and mellow aroma of cooked bananas always made me happy because i knew there is a banana bread for dessert. Unfortunately i couldn't get the recipe from her in time, hence i tried various variations to different recipes for the same taste, the failed attempts and countess tries did me good by finding this treasure. This is the closest i could get to my childhood memory and I'm glad to share it with you all.

    INGREDIENTS:

    • 125 grams salted butter
    • 220 Gms or 1 cup powdered sugar
    • 2 eggs 
    • 3 over ripe bananas, Mashed , using over ripe black bananas is the trick , you will never get the best flavour and consistency otherwise 
    • 260 Gms or 1 3/4 cup flour   (maida)
    • 1 Tsp Baking soda
    • Chocolate chips 


    METHOD:

    • Grease a 1 lt loaf pan, and preheat the oven at 180 degrees.
    • Using an electric whisker, whisk the butter and sugar, until pale and thick. 
    • Add in the eggs and mashed banana, mix until well combined.
    • Mix the flour and baking soda, whisk until the mixture is smooth. Mix a few of the chocolate chips as much you desire, they add a nice chocolatey crunch.
    • Spoon the batter in the loaf pan, sprinkle some chocolate chips on the batter and bake for 52-55 minutes, or until a skewer comes clean.

    * Banana bread goes well with caramel sauce, nutella and peanut butter.
    * Wrapped in a cling wrap , can stay for up to 2 month in the refrigerator
    * You can toast banana bread as well and it tastes sinfully delicious with a glass of plain cold milk.


    2

    Monday, 25 January 2016


    I am sorry for not posting on the blog for a while now, but I couldn't miss posting  on the republic day of India, because I'm most certainly a proud and patriotic Indian. For this post Ive given the Idli (steamed  savoury rice cake ) a makeover with adding the lovely hues of the indian tricolour adorned with some chutney and its not an idli its a cupcake !!! Wishing everybody a very Happy Republic Day, 

    Hope you enjoy the day.


    INGREDIENTS :

    For the Idli :
    • 1 cup semolina / sooji 
    • A little less than 1 cup of curd
    • salt to taste 
    • Eno or any other brand of  fast-action effervescent fruit salts.
    For the chutney:

    • 1/2 cup desiccated coconut, preferable fresh (I couldn't find fresh coconut , hence used the dried )
    • 1/4 cup toasted gram 
    • 2-3 badge  chillies
    • salt to taste 


    Method:

    • Mix the semolina and curd together , to form a thick batter consistency.
    • In 2 mixing bowls spoon out equal amount of batter and use green and orange food colourings ( I used organic ones by sprig )
    • Use a pin or needle to make holes at the bottom of the cupcake liner. 
    • Spoon the batter into cupcake liners. (for an even look use a piping bag)
    • For the chutney mix all the ingredients and bled them coarsely in the mixer. 
    • Heat a teaspoon of clarified butter , add in some curry leaves and mustard seeds and pour over the ground mixture.
    • Using a open star piping tip for the ruffle effect.


    0

    Sunday, 10 January 2016


    A very happy new year to all of you , may this year be fulfilled, hassle free, prosperous and successful , may all of you eliminate the unnecessary and bring a lot of good food and exciting trysts with taste. Thank you all for your appreciation and love, hoping to make your 2016 even more flavourful.
    Chettinad cuisine is native to the Tamil Nadu region of India known for its aromatic and fiery dishes, The chicken Chettinad is personally one of my favourites and works well for my new year resolution of being healthy and following a low carb diet and that's why this is my first post of this year.
    This dish is very flavoursome, aromatic and indubitably the least complex of authentic indian dishes that I've tried my hands at.

    INGREDIENTS :


    • 1 kg boneless chicken 
    • 2 medium onions, chopped 
    • 8-10 cloves of garlic 
    • 8-10 dried red chillies ( you can vary the quantity depending on your spice intake)
    • 15-20 Curry leaves and a few extra for frying 
    • 2 Tbsp coriander seeds / sabut hara dahlia
    • 1/2 tsp mustard seeds 
    • 1 stick of cinnamon 
    • star anise 
    • 3/4 cup toasted gram
    • 1/4 tsp turmeric 
    • 1/2 cup curd 
    • 1/4 cup water 

    METHOD:


    • Dry roast all the spices, red chillies, coriander seeds, mustard seeds, curry leaves, cinnamon and star anise.
    • Once the spices are roasted, grind them with the toasted gram to a fine powder.
    • Sauté the onion, garlic and curry leaves until the onion is translucent. Add the chicken.
    • Drizzle over the ground masala and coat the chicken well.
    • Once the chicken is half cooked, stir in the water and curd.
    • Cover the pan until the chicken is completely cooked.
    • Once cooked garnish with cilantro leaves and some lemon to enhance the flavours.


    0

    Author

    ADs